1. Do not change the name of the sheets once the components mapped otherwise Xcelsius file will not open next time
2. Do not use the " Disable Mouse Input on Load" option when using Clender component in dashboard. Doing this will make calender hanged and multiple dates will be selected, thus value will not update in binded cell.
3. Excel formulas cant be written using reference of LiveOffice rows, as LiveOffice deletes the old rows and then insert new rows while Refreshing. But while using these liveoffice excels, in Xcelsius 2008, which contains formulae and referencing to the liveoffice data cells, formulae work correctly.
4. Always use Detail objects in SAP Cube/BEx based universes, while filtering data in WebI report. It could happen that you are using Dimension Object and at the time of using it there is no TEXT available for the Key then you can filter on Key, but later on if there will be data in Cube for the field against the key you had used and text for that InfoObject in cube is enabled, then your query won't filter results correctly. For e.g. I have One dimension object in universe Employement Type which I was filtering in WebI as, Employement Type : 3 (3 means Active), but later on in cube value against this key is entered and Text is made enabled at InfoObject level, my WebI qury is not filtering and I had changed it to Employement Type : Active, and my WebI then worked correctly.
5. Do not refresh more then one the LiveOffice connections in Xcelsius dashboard simultaneoulsy, must referesh them in serial oreder. Try some logic to refresh them in serial order as I used Idle and Loading messages as flags to know the refresh status of previuos connection and submit the next connection refresh only after previous liveoffice successfully refreshed. For details write to me and add your email I will send you the sample Xcelsius file.
Please add-on more :)
Thursday, August 20, 2009
Monday, July 20, 2009
Xcelsius Dashboard from WebI report (with prompt) using LiveOffice
Environment Details:
BOXI R3.1
BOXI R3.1
SAP BI Backend
Live Office XI R3.1
Xcelsius 2008
1. Create webI report for prompt display values which will be used to get input from user in Xcelsius Dashboard. Let this report is exported to CMS with name “prompt values”
Note: Use Detail values instead of dimension objects

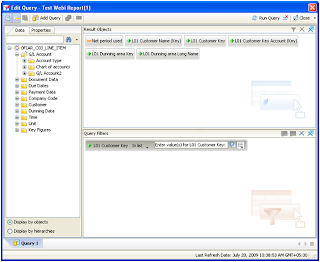
2. Now create the report with prompt (Customer Key in this case) and export this report to CMS, in this case report name is “Test Webi Report(1)”
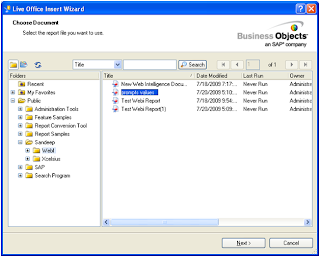
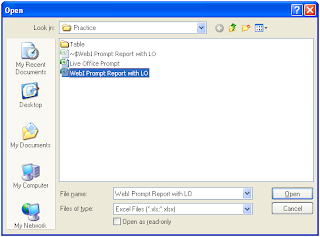
3. Now insert these webI documents in Excel using Live office
First insert the prompt values webi report
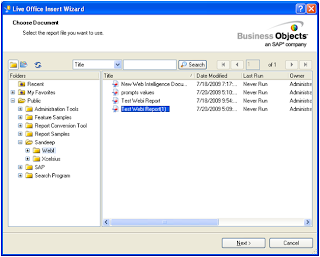
5. Now Import webI report which contains the dashboard data.
6. Refresh all the connections
Live Office XI R3.1
Xcelsius 2008
1. Create webI report for prompt display values which will be used to get input from user in Xcelsius Dashboard. Let this report is exported to CMS with name “prompt values”
Note: Use Detail values instead of dimension objects

2. Now create the report with prompt (Customer Key in this case) and export this report to CMS, in this case report name is “Test Webi Report(1)”

3. Now insert these webI documents in Excel using Live office
First insert the prompt values webi report

5. Now Import webI report which contains the dashboard data.

6. Refresh all the connections
7. Select webI report contains dashboard data.
8. Bind the prompt with excel cell

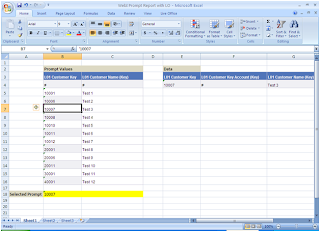
9. Select “Choose Excel data range” option and bound one excel cell (B18 in this case) with prompt values.
Note: Unselect “Append parameter list to the dropdown of the binding cell” if you don’t want list of values to he displayed as drop down box in excel sheet.
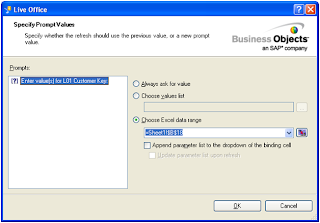
Test the connection change the value (from ‘10007 to ‘10008 for this case, may the value will be different in your case so select accordingly) in selected cell and check if the data is getting refreshed, if yes, then you have successfully created WebI – LO Connection and it is ready to be used in Xcelsius 2008.
10. Save this excel sheet on your machine.
11. Open Xcelsius and import above saved excel sheet as data source
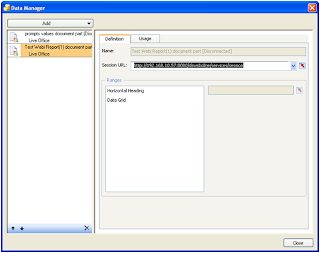
12. Goto Data->Connections menu and Add Live Office connection
Note: Must not forget to enter your webserver name/IP address where BOBJ is installed.
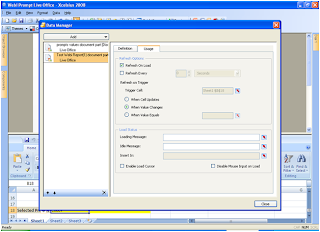
13. On usage Tab of Live Office connection which is being used to get dashboard data , set options “Refresh On Load” and “Refresh on Trigger” and select the cell where we bounded the prompt values (B18) in this case.
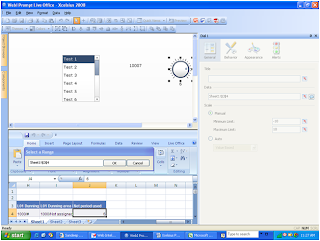
14. Now select List Box (You also can use some other control as per the requirement) and give it Label range (C5 to C16 in this case) from the prompt values which we had selected in WebI report “prompts values”
In Source give full range of prompt values and in destination must include which is bounded to webI prompt (B18).
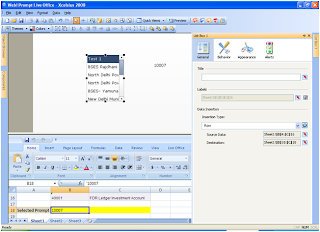
15. Add One more control (dial in this case) and set its value from dashboard data. Its value must be changed as we select different customers from the list box we created
16. Preview the file, enter credentials and data should be updated as you select different customers.
17.Export it to CMS and open it from Infoview.
Please revert back if you any problem.
Enjoy
Sandeep Manocha

8. Bind the prompt with excel cell

9. Select “Choose Excel data range” option and bound one excel cell (B18 in this case) with prompt values.
Note: Unselect “Append parameter list to the dropdown of the binding cell” if you don’t want list of values to he displayed as drop down box in excel sheet.

Test the connection change the value (from ‘10007 to ‘10008 for this case, may the value will be different in your case so select accordingly) in selected cell and check if the data is getting refreshed, if yes, then you have successfully created WebI – LO Connection and it is ready to be used in Xcelsius 2008.
10. Save this excel sheet on your machine.
11. Open Xcelsius and import above saved excel sheet as data source

12. Goto Data->Connections menu and Add Live Office connection
Note: Must not forget to enter your webserver name/IP address where BOBJ is installed.

13. On usage Tab of Live Office connection which is being used to get dashboard data , set options “Refresh On Load” and “Refresh on Trigger” and select the cell where we bounded the prompt values (B18) in this case.

14. Now select List Box (You also can use some other control as per the requirement) and give it Label range (C5 to C16 in this case) from the prompt values which we had selected in WebI report “prompts values”
In Source give full range of prompt values and in destination must include which is bounded to webI prompt (B18).

15. Add One more control (dial in this case) and set its value from dashboard data. Its value must be changed as we select different customers from the list box we created

16. Preview the file, enter credentials and data should be updated as you select different customers.
17.Export it to CMS and open it from Infoview.
Please revert back if you any problem.
Enjoy
Sandeep Manocha
Subscribe to:
Posts (Atom)